Email Setup
CORE INFO
Email Address:
Account Type:
IMAP (or POP3 if you're on a legacy plan)
Incoming mail server:
mail.miramar.ca
Outgoing mail server (SMTP):
mail.miramar.ca
Incoming Ports:
IMAP: 993 (SSL), POP3: 995 (SSL)
Outgoing Port:
SMTP: 587 (STARTTLS or TLS if STARTTLS is not found)
User Name:
Password:
To add more security, we highly recommend you add 2-step authentication. Log into webmail at https://mail.miramar.ca with your specific account, go to Settings (under More), then go to Account and under Two-Step Authentication you can click the Enable button to walk through the setup.
Adding A New Email Account
STEPS
- In Outlook, go to File, Click the Info tab (In older Outlook versions go to the Tools tab)
- Click Account Settings, select Manage Profiles, click Email Accounts and click New on the next page
(In older Outlook versions you can simply click Add Account or click Account Settings then the "New" button on the next page) - Click Manually configure server settings or additional server types radio button or Advanced options with a checkbox for Let me set up my account manually.
- Click Next.
- Click the POP or IMAP radio button if neccessary and click Next.
- Enter the following information:
- Your Name:
- Email address: [email protected]
- Account Type: IMAP (use POP3 if you are on a legacy plan/need POP3)
- Incoming Server: mail.miramar.ca
- Outgoing Mail server: mail.miramar.ca
- User name: [email protected]
- Password: [provided to you by Miramar]
- Make sure the Require logon using Secure Password Authentication (SPA) is NOT checked off
- Click on the More Settings button
- Navigate to Outgoing Server Tab
- Check "My outgoing server (SMTP) requires authentication".
- Navigate to Advanced Tab
- Set the Incoming server type to SSL with a port number of: 993 (use port: 995 if using POP3)
- Set the Outgoing server type to STARTTLS or if STARTTLS isn't found use TLS with a port number of: 587
- Click OK.
- Click Next.
- Click Finish.
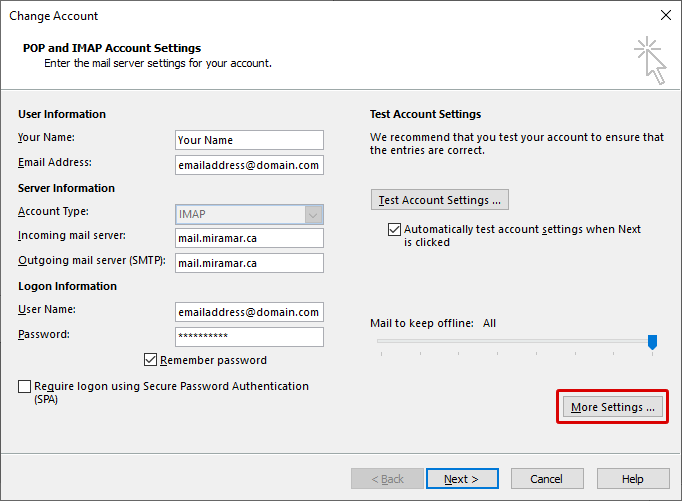
Example Image of Outlook Settings (make sure to put your email address and username)
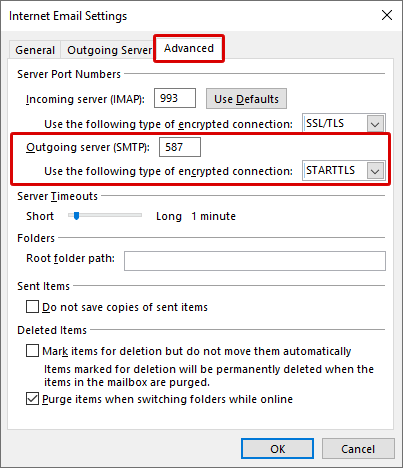
Example Image of Outlook Advanced Settings
Editing An Existing Email Account
STEPS
- In Outlook, go to File, Click the Info tab
- Click Account Settings, select Manage Profiles, click Email Accounts, select the email account you'd like to configure and click Change
(In older Outlook versions this is found under Account Settings and then clicking Account Settings in the drop down again if neccessary) - Click the account you want to edit
- Click change OR double click the account name.
- Enter the following information:
- Your Name:
- Email address: [email protected]
- Account Type: IMAP (use POP3 if you are on a legacy plan/need POP3)
- Incoming Server: mail.miramar.ca
- Outgoing Mail server: mail.miramar.ca
- User name: [email protected]
- Password: [provided to you by Miramar]
- Click on the More Settings button
- Navigate to Outgoing Server Tab
- Check "My outgoing server (SMTP) requires authentication".
- Navigate to Advanced Tab
- Set the Incoming server type to SSL with a port number of: 993 (use port: 995 if using POP3)
- Set the Outgoing server type to STARTTLS or if STARTTLS isn't found use TLS with a port number of: 587
- Click OK.
- Click Next.
- Click Finish.
Changing Your Email Password
STEPS
- Login at mail.miramar.ca
- Click the Gear icon for Settings on the top navigation menu
- Under the Account tab (left side navigation) you can click the blue Change Password button in the main pane
- Change password and click Save in the popup
Adding A Calendar to Outlook
STEPS
- Login at mail.miramar.ca
- Click on the Calendar icon
- Near the top click the ... blue button and select Add To Outlook from the drop down
- Fill in which version of Outlook you have, select which calendar you want and enter a display name for the calendar
- Click OK
- A pop up should come up asking if it should launch an application, click Yes or Launch
- A pop up should come up in Outlook asking if it should proceed, click Yes
- Your calendar has been added and you can either repeat these steps on a new calendar or exit the current window on webmail.
Adding Email to iOS
STEPS
- In iOS go to Settings
- Click Apps
- Click Mail
- Check under Privacy Protection and ensure Protect Mail Activity is disabled and then go back one menu screen
- Click Mail Accounts
- Click Add Account.
- Click Other
- Click Add Mail Account.
- Enter the following information:
- Name:
- Email: [email protected]
- Password: [provided to you by Miramar]
- Description: Any description you choose to remember the email account
- Click Next
- Enter the following information if not already populated:
- Click IMAP (use POP3 if you are on a legacy plan/need POP3)
- Name:
- Email: [email protected]
- Description: Any description you choose to remember the email account
- Incoming Server Host Name: mail.miramar.ca
- User name: [email protected]
- Password: [provided to you by Miramar]
- Outgoing Server Host Name: mail.miramar.ca
- User name: [email protected] Note: This is REQUIRED
- Password: [provided to you by Miramar] Note: This is REQUIRED
- Click Save at the top right.
Uploading Files
Keep in mind that uploaded files take away from your email storage!
STEPS
- Login at mail.miramar.ca
- Click the File Storage icon on the top menu
- You can create folders by right clicking the My Files title on the left navigation pane
- You can upload files by clicking Upload and selecting a file from your computer and clicking open (it may take a minute to upload depending on the file size).
- Once a file is uploaded you can double click to edit. Make sure to click the checkbox for Enable public access. You can then copy the generated URL and paste that into an email or calendar event so that someone can access that file to download.